Wednesday, January 31, 2018

Angular 2+ Project

I had recently developed project based on Angular 5 version. Angular 5 app was built to list seven  wonders of the world. The single page application was developed by using angular-cli/TypeScript/bootstrap 4. Project skelton was created using angular cli version 1.6.5. 

Data that is displayed in the app is fetched from json file and lists all wonders of the world. When you click on each wonder it would list details of the specific wonder. In this project I had used angular services,angular components, nested components & routing. Project also uses font awesome css.

Completed code is available on my github link

Here is the Demo of the application.


Thursday, September 14, 2017

Grouping SharePoint List Items using Jquery/REST/JSON

In this post, I will share requirement where I need to retrieve SharePoint list data that contains following list items.


Below is what I need to from SharePoint list:

1. I need to group below list based on the Title.
2. I need to display the grouped results with sum of Number column.

The end result should be as below:

Name:One- Total 10
Name:Two- Total 7
Name:Three- Total 6

Main issue here is the SharePoint REST API doesn't support grouping. The above requirement can be achieve by grouping the JSON response that is obtained from the REST query. Below is the complete code that does grouping.


Tuesday, September 12, 2017

Branding SharePoint 2016 Suite bar using SharePoint Jquery/REST API

In this post, I will sharing my recent experience of customizing SharePoint 2016 suite bar branding. As we know SharePoint out of box suite bar looks like below with following elements.


Following tasks can be accomplished on the SharePoint suite bar.

1. We can replace the default SharePoint text with either your company name or company logo. This can be done by accessing SharePoint CSS class ''o365cs-nav-leftAlign" and "o365cs-nav-brandingText" using Jquery.

2. In the center section of the suite bar, we can add text or icon using css class "o365cs-nav-centerAlign".

3. In the right section, I will adding suite bar links using SharePoint css class 'o365cs-nav-rightAlign'.

This post will majorly discuss branding the left and right sections of the SharePoint 2016 suite bar.

The final output will be as follows:

1. On the left side of the suite bar, I will be placing logo using SharePoint Jquery/REST.
2. On the right side of the suite bar, I will be placing suite bar links and when clicked on these suite bar links, I will be displaying additional sub menu links.


Development:

I had created entire solution as farm solution and once I have the wsp I had used the wsp in SharePoint HTML master page so that I can see the suite bar branding elements in every page of my custom master page.

Below is the final structure of my the project:


In the visual studio project, I had created visual webpart, The only purpose of the visual webpart is that it holds all the javascript and css customization. Here is the code for visual webpart designer page.


SuiteBarCustom.js: this file will be generating all the HTML elements for right and left section of the suite bar for adding the logo and adding suite links. Below is the code.


SuiteBarCustom.css


Source: I had used SharePoint list to retrieve the links for suite links in SharePoint suite bar.

Deployment: Build the solution and use the wsp generated from the solution to add it onto custom master page. Below snippet is generated from design manager and used in master page.


The above post showed how I  had developed and deployed custom suite bar links.

Monday, September 11, 2017

Deploying SharePoint 2016 master pages using visual studio farm solution

In this post, I will be sharing my recent experience where I had been working on creating SharePoint 2016 HTML master page for intranet. Initially for my development purpose I was directly creating HTML master page using SharePoint designer but when the time came, I was asked to deploy to different environment such as test environment. I finally ended up creating farm based visual studio code solution. Below are steps I had used for creating the wsp solution.

1. Here is the  final structure of solution.


2. Start your visual studio and select empty SharePoint project with farm based solution approach.

3. Add folder called 'FeatureElements' to the project.

4. Right click on FeatureElements and then add module to the folder as shown below.


5. Now, right under the module start adding your HTML files. In my case, I had all my master pages created using SharePoint designer based on seattle.html and I had imported those HTML files into visual studio solution.

6.In the element.xml under the module, make sure to the entries are present for HTML files.


7. If there are any resource files such as CSS/JavaScript/Images you can add those files to this solution by deploying it to Styles/1033 folder or layout folder of 16 hive as shown in above folder structure.

8. Now, at this stage if we deploy the above solution, html master pages will be available in master page gallery of the site collection and here you need to publish the html master page by using context menu and then it generates .master file. At this stage  you apply the master page to the site. Entire process can be automated by creating a feature receiver as shown below.

9.Now, Right click on feature receiver to add event receiver as shown in the image below.


10. Once the file is created, In feature activated method add the below code


11. Double click on feature receiver to see the below properties.


12. Use the below PowerShell script to deploy the wsp to the environment.

Install-SPSolution -Identity MasterPageCustomSolution.wsp -WebApplication https://abc.com -FullTrustBinDeployment -force

13. Once the solution is deployment, go to site collection feature and activate the feature. The master page will be available for you in master page settings page and can set it as default master page.

Bootstrap Image carousel using SharePoint Jquery REST API

In this blogpost, I am going to create Bootstrap Image carousel using SharePoint Jquery REST API, The basic idea is that images are retrieved from SharePoint list and by using SharePoint Jquery/ REST API I will be retrieving the list items and render it to UI using Boostrap version 3 carousel code.


SharePoint list: I am maintaining images in separate picture library and I am referring the links in below list. Carousel images are clickable and links are indicated in appurl. I am also doing sorting on images so that I can show specific image in order. I had added reference for boostrap.js and bootstrap.css

Bootstrap Carousel:
Here is the link for boostrap carousel version 3.

Usage: Above code can be directly placed in content editor web part.


Result:


Friday, March 17, 2017

Power-Shell for running excel macro and upload the file to FTP server


One of my recent requirement I had a excel macro that basically does data refresh using database connection and finally saves the file to local drive. I was asked to automate the process of running the macro then pick the file that gets saved from local drive and finally upload it to the FTP server. script also contains logging as well.

Below is complete Power-Shell snippet.

function Get-TimeStamp {
 
    $timeStamp = "[" + (Get-Date).ToShortDateString() + " " + ((Get-Date).ToShortTimeString()) + "]"  
    Return $timeStamp
 
}

Write-Output "`n" | Out-file E:\PowerShell\Logs\log.txt -append
Write-Output "$(Get-TimeStamp) *******************Starting the PowerShell Script*******************" | Out-file E:\PowerShell\Logs\log.txt -append

#ftp server configuration
$ftp = "ftp://abc/def/"
$user = "username"
$pass = "password"

#Input file
$FilePath="E:\PowerShell\S.xlsb"  

#Target file
$targetFilePath = "E:\PowerShell\L.xlsb"

Remove-Item $targetFilePath

#Create an Object Excel.Application using Com interface
$objExcel = New-Object -ComObject Excel.Application

#Disable the 'visible' property so the document won't open in excel
$objExcel.Visible = $false

#Stop displaying alerts
$objExcel.DisplayAlerts = $false

Write-Output "$(Get-TimeStamp) Process the source file....." | Out-file E:\PowerShell\Logs\log.txt -append

#Open the Excel file and save it in $WorkBook
$WorkBook = $objExcel.Workbooks.Open($FilePath)

"Running the macro..."
#Run the macro
$objExcel.Run("MacroName")

#close the workbook
$WorkBook.close()

#quit the instance of excel
$objExcel.Quit()

Write-Output "$(Get-TimeStamp) Document copied to target drive" | Out-file E:\PowerShell\Logs\log.txt -append

#creating web commendlet object for uploading to FTP server
$webclient = New-Object System.Net.WebClient

#passing credentials to webclient object
$webclient.Credentials = New-Object System.Net.NetworkCredential($user,$pass)

#creating object for file and target file
$file = Get-Item -Path $targetFilePath

$uri = New-Object System.Uri($ftp+$file.Name)

Write-Output "$(Get-TimeStamp) Sleeping for 60 seconds..." | Out-file E:\PowerShell\Logs\log.txt -append
Start-Sleep 60

Write-Output "$(Get-TimeStamp) start uploading the file" | Out-file E:\PowerShell\Logs\log.txt -append

#uploading the file
$webclient.UploadFile($uri, $targetFilePath)

Write-Output "$(Get-TimeStamp) upload completed" | Out-file E:\PowerShell\Logs\log.txt -append

Write-Output "$(Get-TimeStamp) *******************Finishing PowerShell Script*******************" | Out-file E:\PowerShell\Logs\log.txt -append

Friday, January 6, 2017

Document Library Image Slider

Document slider based on SharePoint 2013 Document library

Below custom Jquery creates an image slider based on the documents. Although, I had used a constant image it can changed based on requirement. The slides contains documents present in document library and also folders.


Source code: Link

Output: Use above Js file in content editor web part and it should look like below. When clicked on the image corresponding document can be accessed.


Thursday, December 29, 2016

SharePoint 2013 Quick Launch Customization

One of recent requirement I am working is creating custom quick launch menu on SharePoint 2013 that would have an accordion view plus searchable text box that would essentially search the contents of quick launch menu. The end result would be as you enter each key the results gets refined.

Below is the snapshot of final quick launch menu. As you can see in the image on default page load all the menus are collapsed and while in the 2nd image  user enters text in the search box(for example user types 'r') the results get expanded and displays the appropriate results that has character 'r'.Similarly user types 're' results get further simplified.

Search is implemented using Jquery and it displays results from child menus.


Accordion view of SharePoint 2013 quick launch:

For creating the accordion view, I had used below reference post from max.

http://yakovenkomax.com/converting-sharepoint-2013-quick-launch-to-accordion-menu/

Navigation is based on out of the site settings navigation. Although term store driven navigation can also be used.

Setting up the search on quick launch accordion menu:

Using custom jquery code, I had injected the text box appended it to the header section of the page.

Below is the complete custom Jquery code with the comments. Some portion of below code also contains the code for renaming the suitebar title of the SharePoint page.


Thursday, October 6, 2016

REST operations using SharePoint Hosted Apps

In the following post I will be showing how I had created various REST operations on SharePoint list by using SharePoint hosted addins.

Post covers following rest operations in SharePoint App web:

  • Read lists 
  • Read list Items
  • Read list Items using paging
  • Read list Fields
  • Create list
  • Create list Item
  • Update list Item
  • Delete list
  • Delete list Item
  • Create new list and new list item
  • Add list field

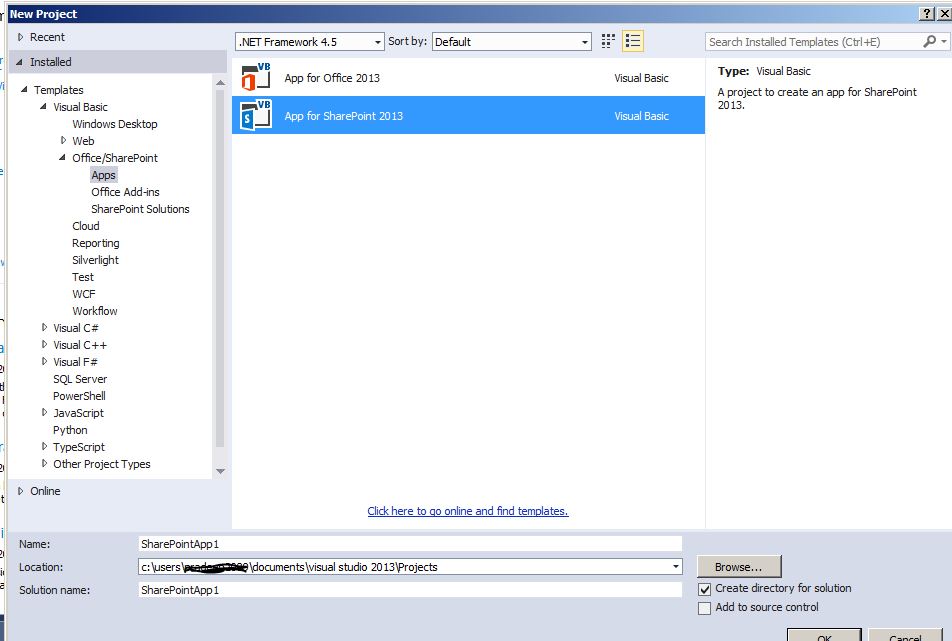
Using Visual Studio, I had created new project then select the App for SharePoint 2013 as template.


In the next window, In the hosting type I had selected SharePoint Hosted App.


After the project is created, Project structure looks like below. There are several parts in the projects such as Pages, Scripts, List Instance, Images.


I had created list called 'TestData' that would contain player information,

In the Pages section I had added CRUD.aspx. It is the main page for the application.

In the Scripts folder I had various javascript files such as app.js, crud.js, ListManager.js, ListItemManager.js.

CRUD.aspx - The file contains DIV that would display the results of various operations and also there are various buttons for CRUD operations for performming respective task. The references for below js libraries are added in PlaceHolderAdditionalPageHead  section.

CRUD.js - The file contains logic for REST CRUD operations.

ListManager.js - The file contains logic to fetch or create list.

ListItemManager.js -  The file contains logic for updating, creating list item.

App.js - The files contains logic to log and display the error to div. CRUD.aspx

Creating SharePoint List 'TestData'

Right on project and then add new item to create a new list.


I had created new columns to the 'TestData' list and added sample data. Below is element.xml file for SharePoint list.


In CRUD.aspx I had added several button controls for various REST operations and also DIV to display the result of button click operation.


In CRUD.js I am creating/using namespace 'JSREST' as not to pollute the global namespace.When the page is fully loaded I am attaching button click event handlers and calling respective function.


Reading SharePoint lists using REST in SharePoint Hosted Apps:

On read button click, readlists() function is executed.


CRUD.js


ListManager.js


Result:


Reading SharePoint list items using REST in SharePoint Hosted Apps: 

On read list items button click _readListItems function is executed in CRUD.js


ListItemManager.js


Result:


Read list item paged:

On Read items paged button click _readListItemsPaged() function will be invoked.


Result:
1st result page


2nd result page


Read all list fields:


_readListFields() is executed when I had clicked on Read list fields button control.

CRUD.js


ListManager.js


Result:


Create SharePoint list:


On Create List button click, _createList() function is executed in crud.js

crud.js


ListManager.js


Result:


Create List Item:

_createListItem will be executed on Create List Item button click


Result:


Update SharePoint List Item:

_updateListItem() is called when update List Item is clicked

crud.js


 ListItemManager.js


Result:


Delete SharePoint List


_deleteList() is executed when delete list is clicked.


Result


Delete SharePoint list item


_deleteListItem is executed when delete list item is clicked

crud.js


listItemManager.js


Result:


Create List with item:


_createListwithNewItem() is executed when create list with item is executed.

crud.js


ListManager.js


ListItemManager.js


Result


Add SharePoint List Field


_addListField is executed when Add field is clicked.

crud.js


listManager.js


Result


App.js


Complete Source Code: Link